

What Are Amazon Web Services (Aws) Honeypot Data
AWS Honeypots
Yous can use honeypots in InsightIDR as a charade technology to locate attackers moving around a network. In order to make use of honeypots in your AWS environs, y'all tin can use an Amazon Machine Image (AMI) honeypot provided past InsightIDR. Using this AMI, you tin can deploy InsightIDR honeypots in your AWS EC2 instances in order to monitor your virtual private cloud (VPC) subnets.
With AWS honeypots, y'all can detect if an intruder is scanning your AWS surroundings from within, attempting to laterally move through your network. If the intruder happens upon this AWS Honeypot, InsightIDR will fire alerts to notify you automatically.
Deployment Architecture
Because honeypots are traps used to identify unexpected network traffic and catch intruders during lateral motility or exploration, you should deploy a honeypot to each isolated network segment.
For standard environments, one honeypot per VPC is sufficient. Even so, to increase coverage, y'all can deploy honeypots to your individual subnets.
Honeypots cannot take a public IP address and must be able to connect to the Insight platform. Therefore, do not deploy the honeypot on public subnets.
Yous tin configure an AWS Honeypot in two means: through a Rapid7 provided CloudFormation Template, or by manually configuring a honeypot in your AWS console.
To add together an AWS honeypot to your environment:
- Create a Honeypot Token
- Choose a Honeypot Setup
- Review the Launch Status
- Trigger a Test Alert
Create a Honeypot Token
Before you tin create a honeypot in your AWS surroundings, yous must first add an AWS Honeypot in InsightIDR in order to acquire a token. You tin can then employ this token to register the honeypot in AWS to your InsightIDR account.
To create a token:
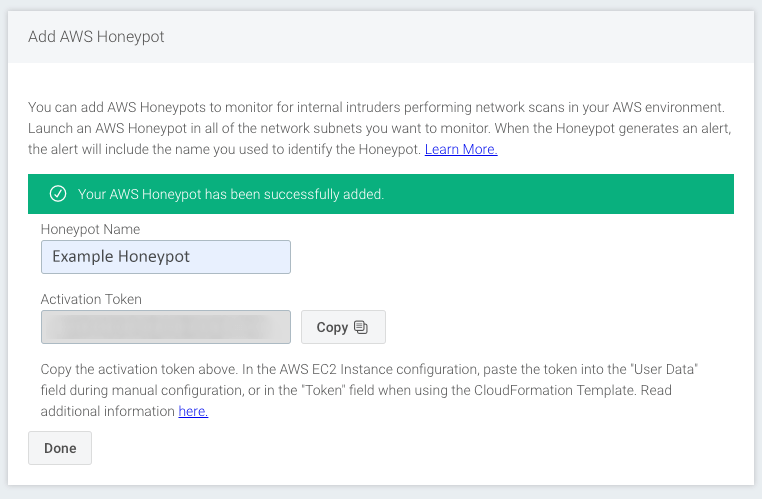
- Sign in to InsightIDR.
- Select the Data Collection page from the left menu, and then click Setup Honeypot > Add together AWS Honeypot.
- Proper noun your honeypot something identifiable.
- Click the Add together button to annals the honeypot name.
- The registration token will announced. Click the Copy button to copy the token for later utilise in your AWS console.
Cull a Honeypot Setup
Y'all can choose from the post-obit setup options:
- Deploy the Rapid7 CloudFormation Template
- Manually Configure your AWS Surroundings
Deploy a honeypot in each subnet you're interested in monitoring in your AWS environment.
Deploy the Rapid7 CloudFormation Template
If you want to deploy the AWS Honeypot in fewer steps, yous can use the Rapid7 CloudFormation Template to configure most of the settings. In order to employ the CloudFormation template, you must take the following permissions:
- Launch EC2 instances
- Create Security Groups
- Create IAM roles
- Create Lambdas
- Create CloudFormation stacks
Yous tin can access the CloudFormation Template magician straight hither: https://console.aws.amazon.com/cloudformation/home#/stacks/new?stackName=insightidr-honeypot-0&templateURL=https://s3.amazonaws.com/com.rapid7.razor.public/honeypot/aws/template.yaml
To use the Rapid7 CloudFormation Template:
- Sign in to your AWS Console.
- From the "Services" dropdown, click the CloudFormation page.
- In the top left corner, click the Create Stack push.
- On the "Select Template" folio, select the Specify an Amazon S3 Template URL choice at the bottom of the folio.
- Paste in the following value:
https://s3.amazonaws.com/com.rapid7.razor.public/honeypot/aws/template.yaml
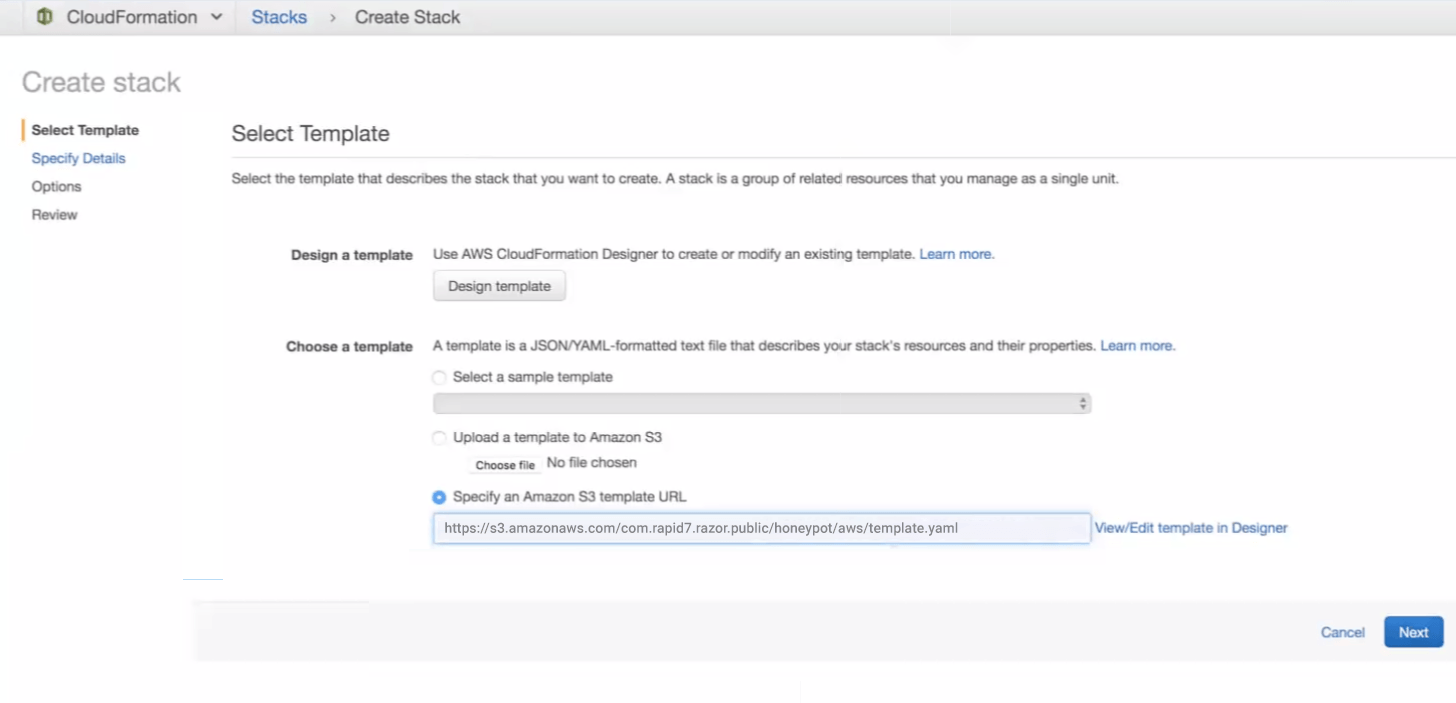
- Click the Next button.
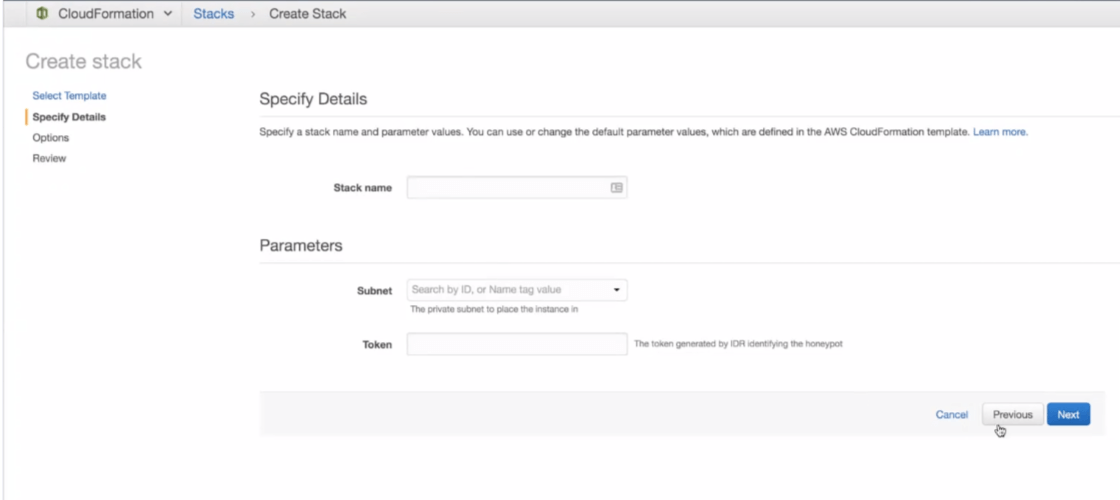
- On the "Specify Details" page, name your AWS Honeypot.
- From the "Subnet" dropdown, select the subnet on which to deploy the Honeypot.
For each subnet that you lot will deploy a honeypot, make sure that the subnet has a NAT instance or NAT gateway that allows EC2 instances in the subnet to communicate out to the public net. This is needed for the Honeypot case to communicate with the Rapid7 Insight platform. An internet gateway is not sufficient for this deployment.
- In the "Token" field, paste the Token you copied from the InsightIDR and click the Next button.
- On the "Options" page, you tin can change any details as desired. Click the Next button when ready.
- On the "Review" page, y'all can review the configuration choices so far.
- Check the Acknowledgement box at the bottom of the folio and click the Create button.
The "Launch Condition" page volition appear.
Manually Configure your AWS Environment
If you prefer to manually configure your AWS surround instead of using the Rapid7 CloudFormation template, ensure that you take permission to launch EC2 instances and create Security Groups within AWS.
To create a Honeypot in your AWS environment:
- Sign in to your AWS Management Console.
- From the "Services" dropdown, get to EC2 and click the Launch New Instance push.
- Alternatively, you can click "Running Instances" and choose an existing instance.
- On the "Choose an Amazon Machine Image" page, select the Community AMI tab and search for Rapid7-InsightIDR-AWS-Honeypot.
- You can also browse the the Rapid7 AMI listing using this text file.
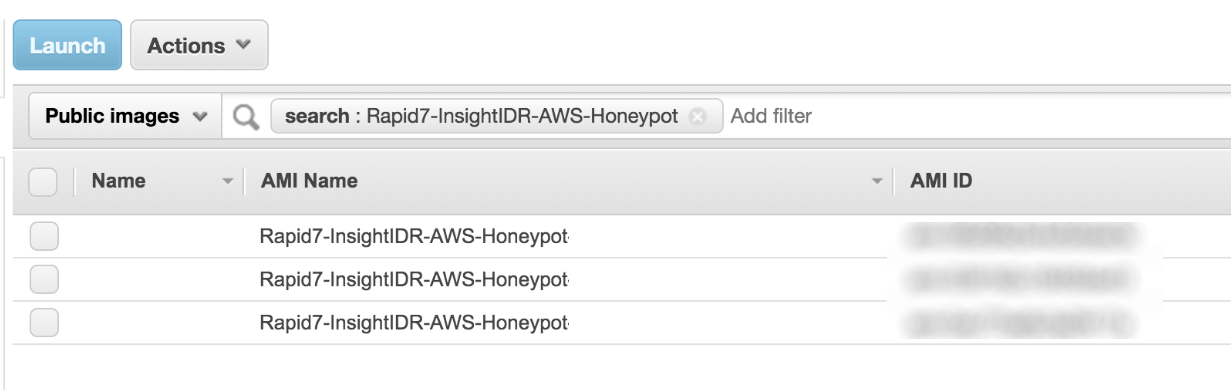
- Click the Select push button depending on what kind of AMI y'all want to create.
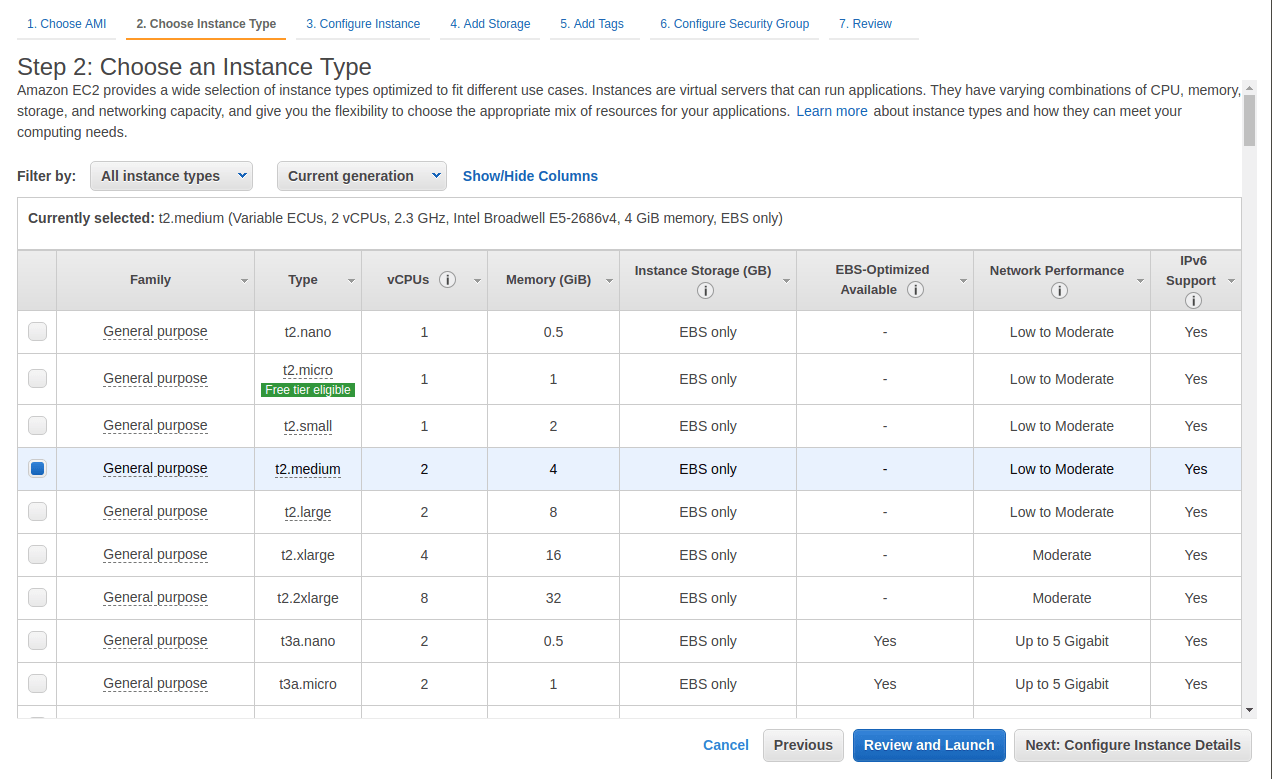
- On the "Instance Type" page, select the t2.medium choice and click the Next button.
- On the "Configure Instance Details" folio, expand the Network dropdown and choose the network y'all want the AWS Honeypot to monitor and mind to.
- Expand the Subnet dropdown and select which subnet y'all want the AWS honeypot available on.
For each subnet that you volition deploy a honeypot, brand sure that the subnet has a NAT instance or NAT gateway that allows EC2 instances in the subnet to communicate out to the public cyberspace. This is needed for the Honeypot instance to communicate with the Rapid7 Insight platform. An internet gateway is non sufficient for this deployment.
- Expand the Auto Assign Public IP dropdown and choose the Disable selection.
If y'all practise not "Disable" this option, your Honeypot will fail to launch.
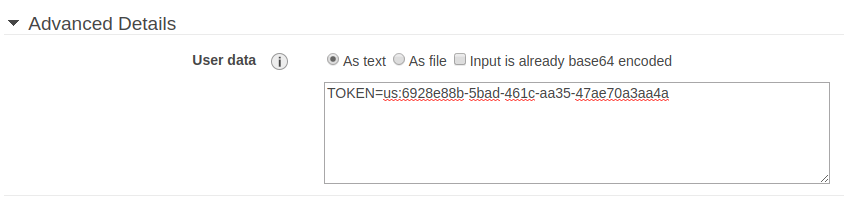
- Gyre down and expand the Advanced Details tab.
- In the "User Data" field, cull the As Text option, and so enter
TOKEN=followed past the Token y'all copied from InsightIDR. Click the Side by side push button when finished.
- On the "Storage" page, choose whatsoever storage details y'all want, and click the Next button.
- On the "Tags" page, apply any tag details you want, and click the Next push button.
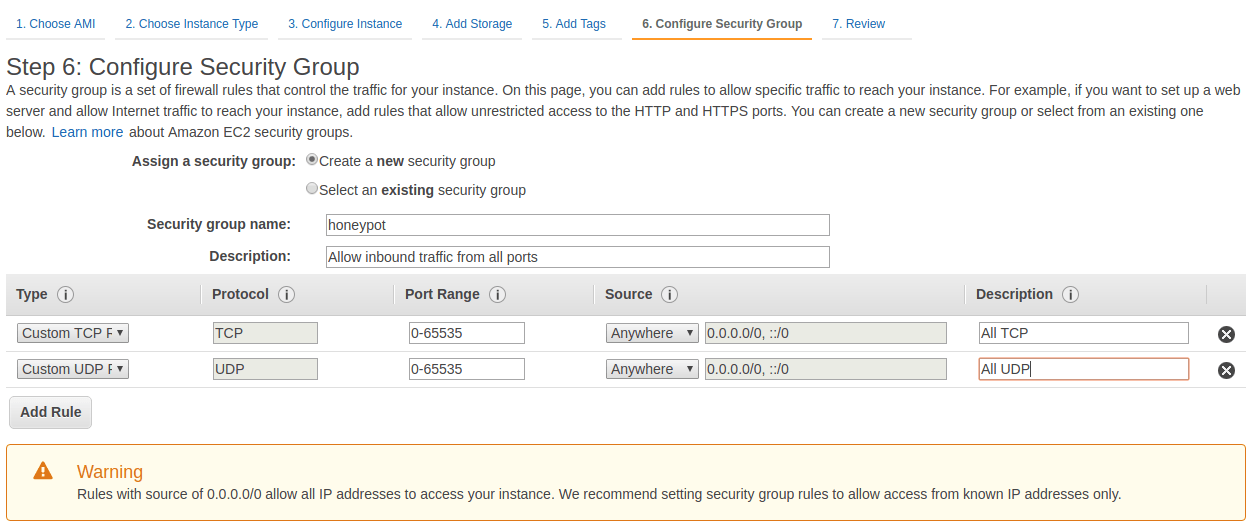
- On the "Configure Security Grouping" page, select the Create a new security group option. Provide a name and description for the security grouping that is identifiable.
- In the table at the lesser of the folio, change the "Type" dropdown to the Custom TCP Rule option.
- In the "Port Range" field, enter "0-65535" as the range.
- In the "Source" field, select the Anywhere choice from the dropdown. Provide a description if desired.
- Click the Add Rule and choose the Custom UDP Dominion selection.
- In the "Port Range" field, enter "0-65535" as the range.
- In the "Source" field, select the Anywhere selection from the dropdown. Provide a description if desired.
- Click the Review and Launch push button.
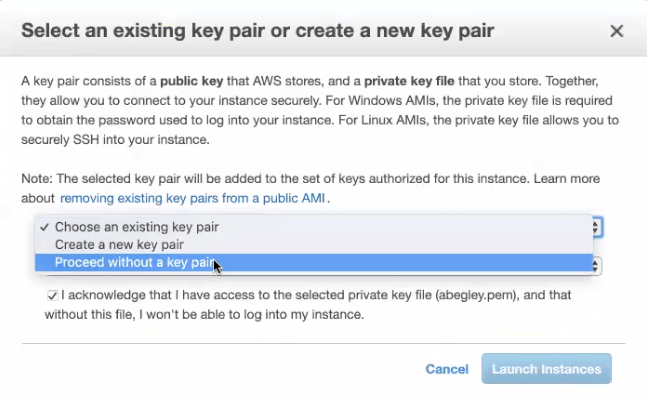
- On the "Review" page, look over the configuration details, and and then click the Launch push button. A new window will appear nigh Cardinal Pairs.
- In the "Central Pair" dialog window, select the option to Proceed without a key pair and check the acknowledgment box.
- Click the Launch Instances push.
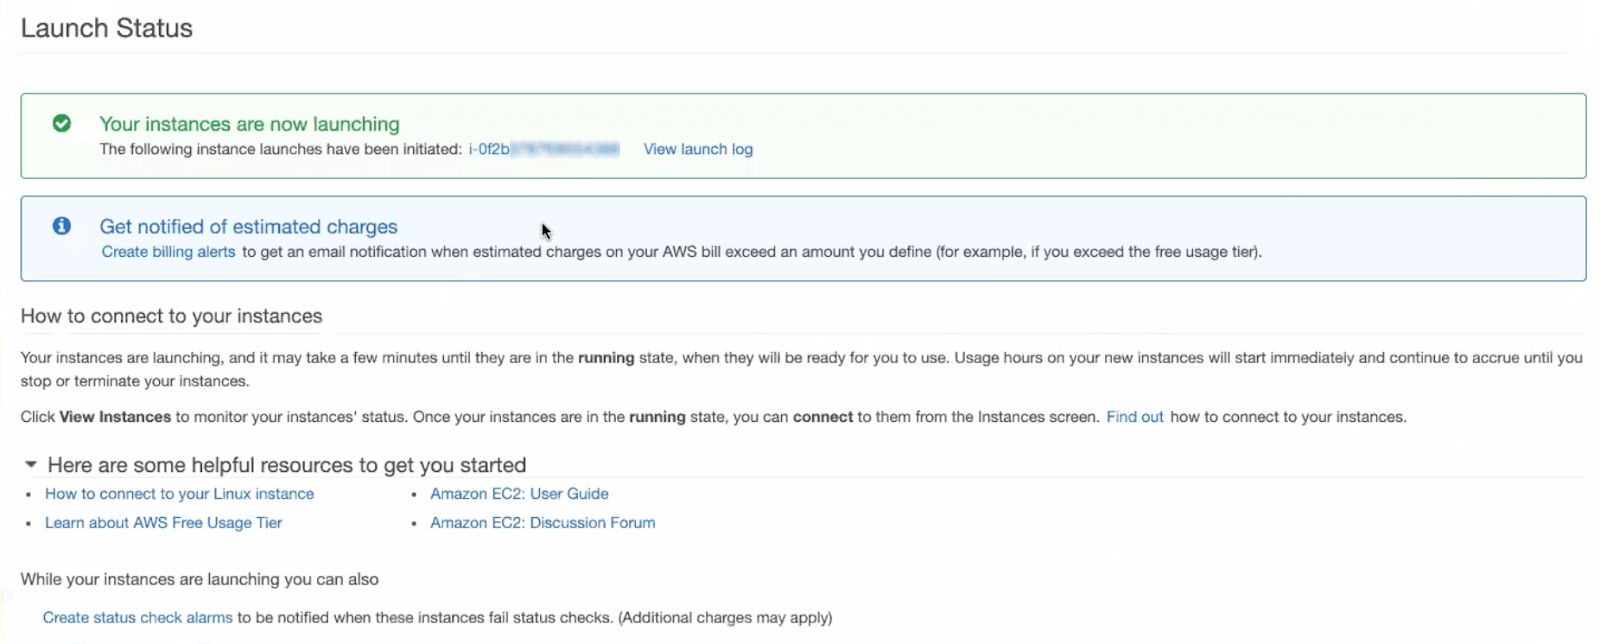
Review the Launch Condition
Once you create and deploy your Honeypot, you volition meet the "Launch Condition" page.
To review the launch condition of your Honeypot:
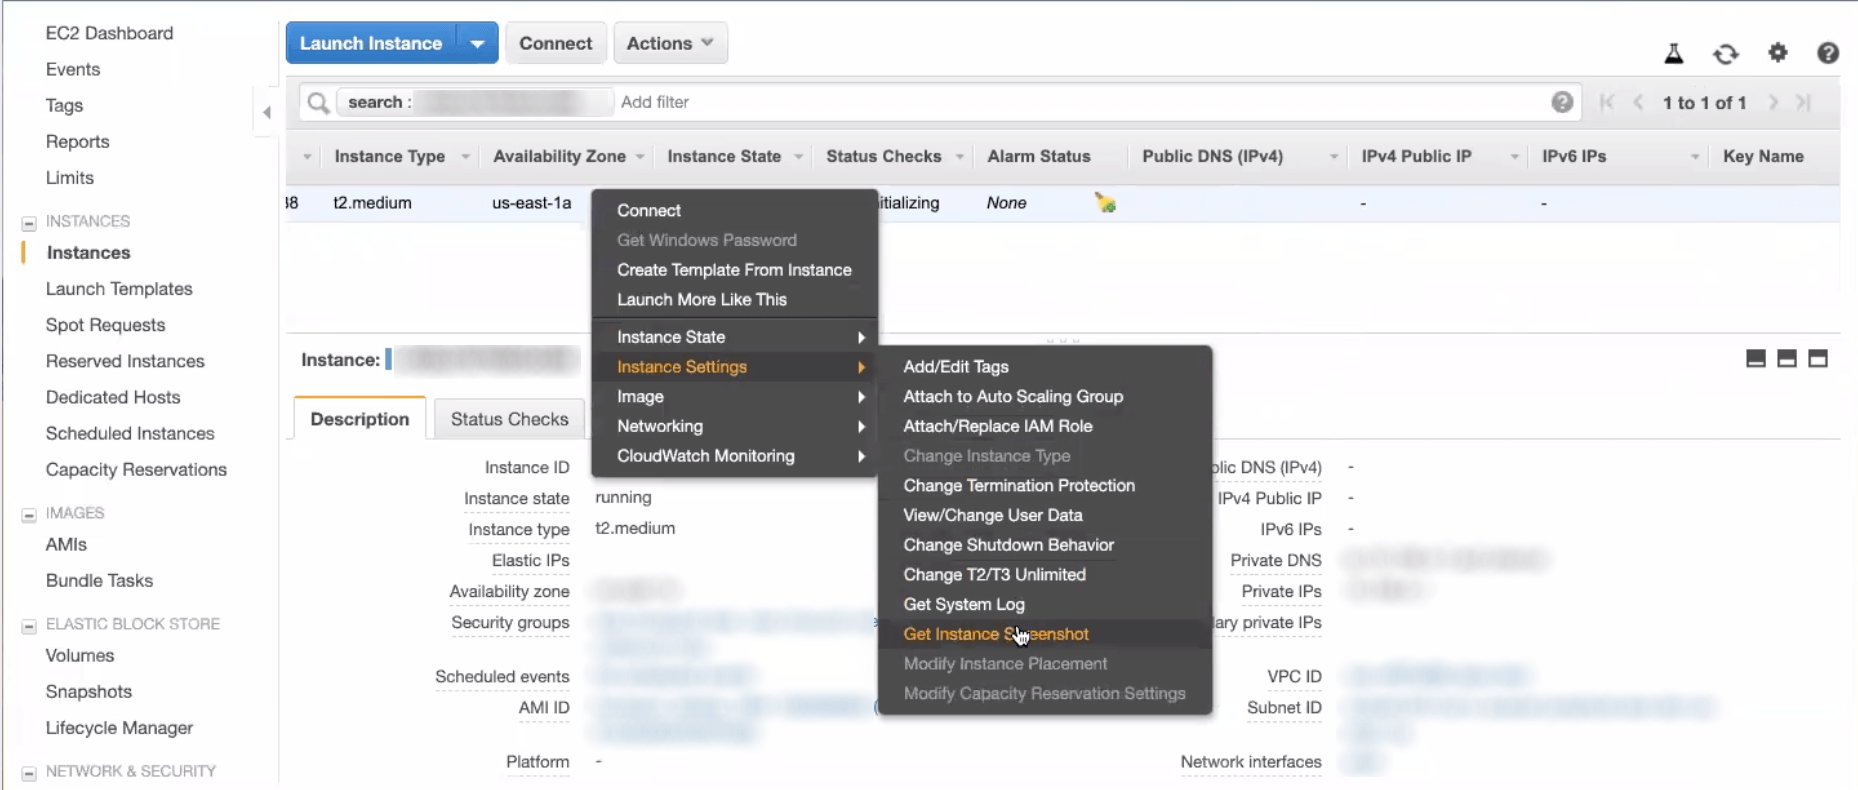
- Click the provided link for your newly launched instance.
- When your instance is running, right click on the table for the properties option and select Instance Settings > Get Organization Log.
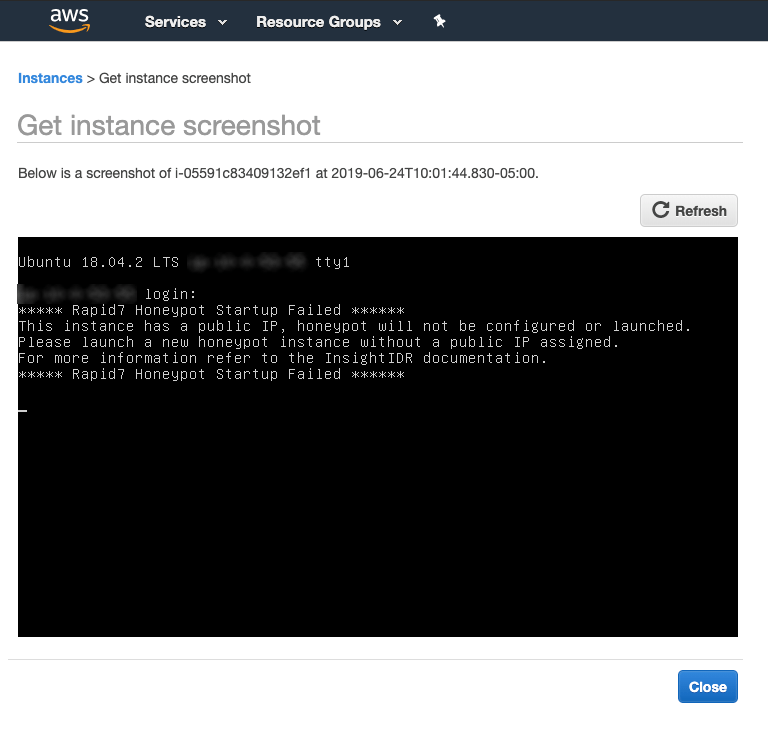
The "System Log" is where you can see the log of your new AWS Honeypot. AWS will populate the system log in near 5 to ten minutes - note that it may initially be black. You will come across the InsightIDR Collector log on this AWS Honeypot, which signals that everything is working correctly.
Mistake Messages
You lot will come across whatsoever error letters in the Case Screenshot, such equally issues reading the registration token, the launched instance having a public IP accost assigned to it, or if the honeypot is unable to communicate over the net to the Rapid7 Insight platform.
Trigger a Examination Alert
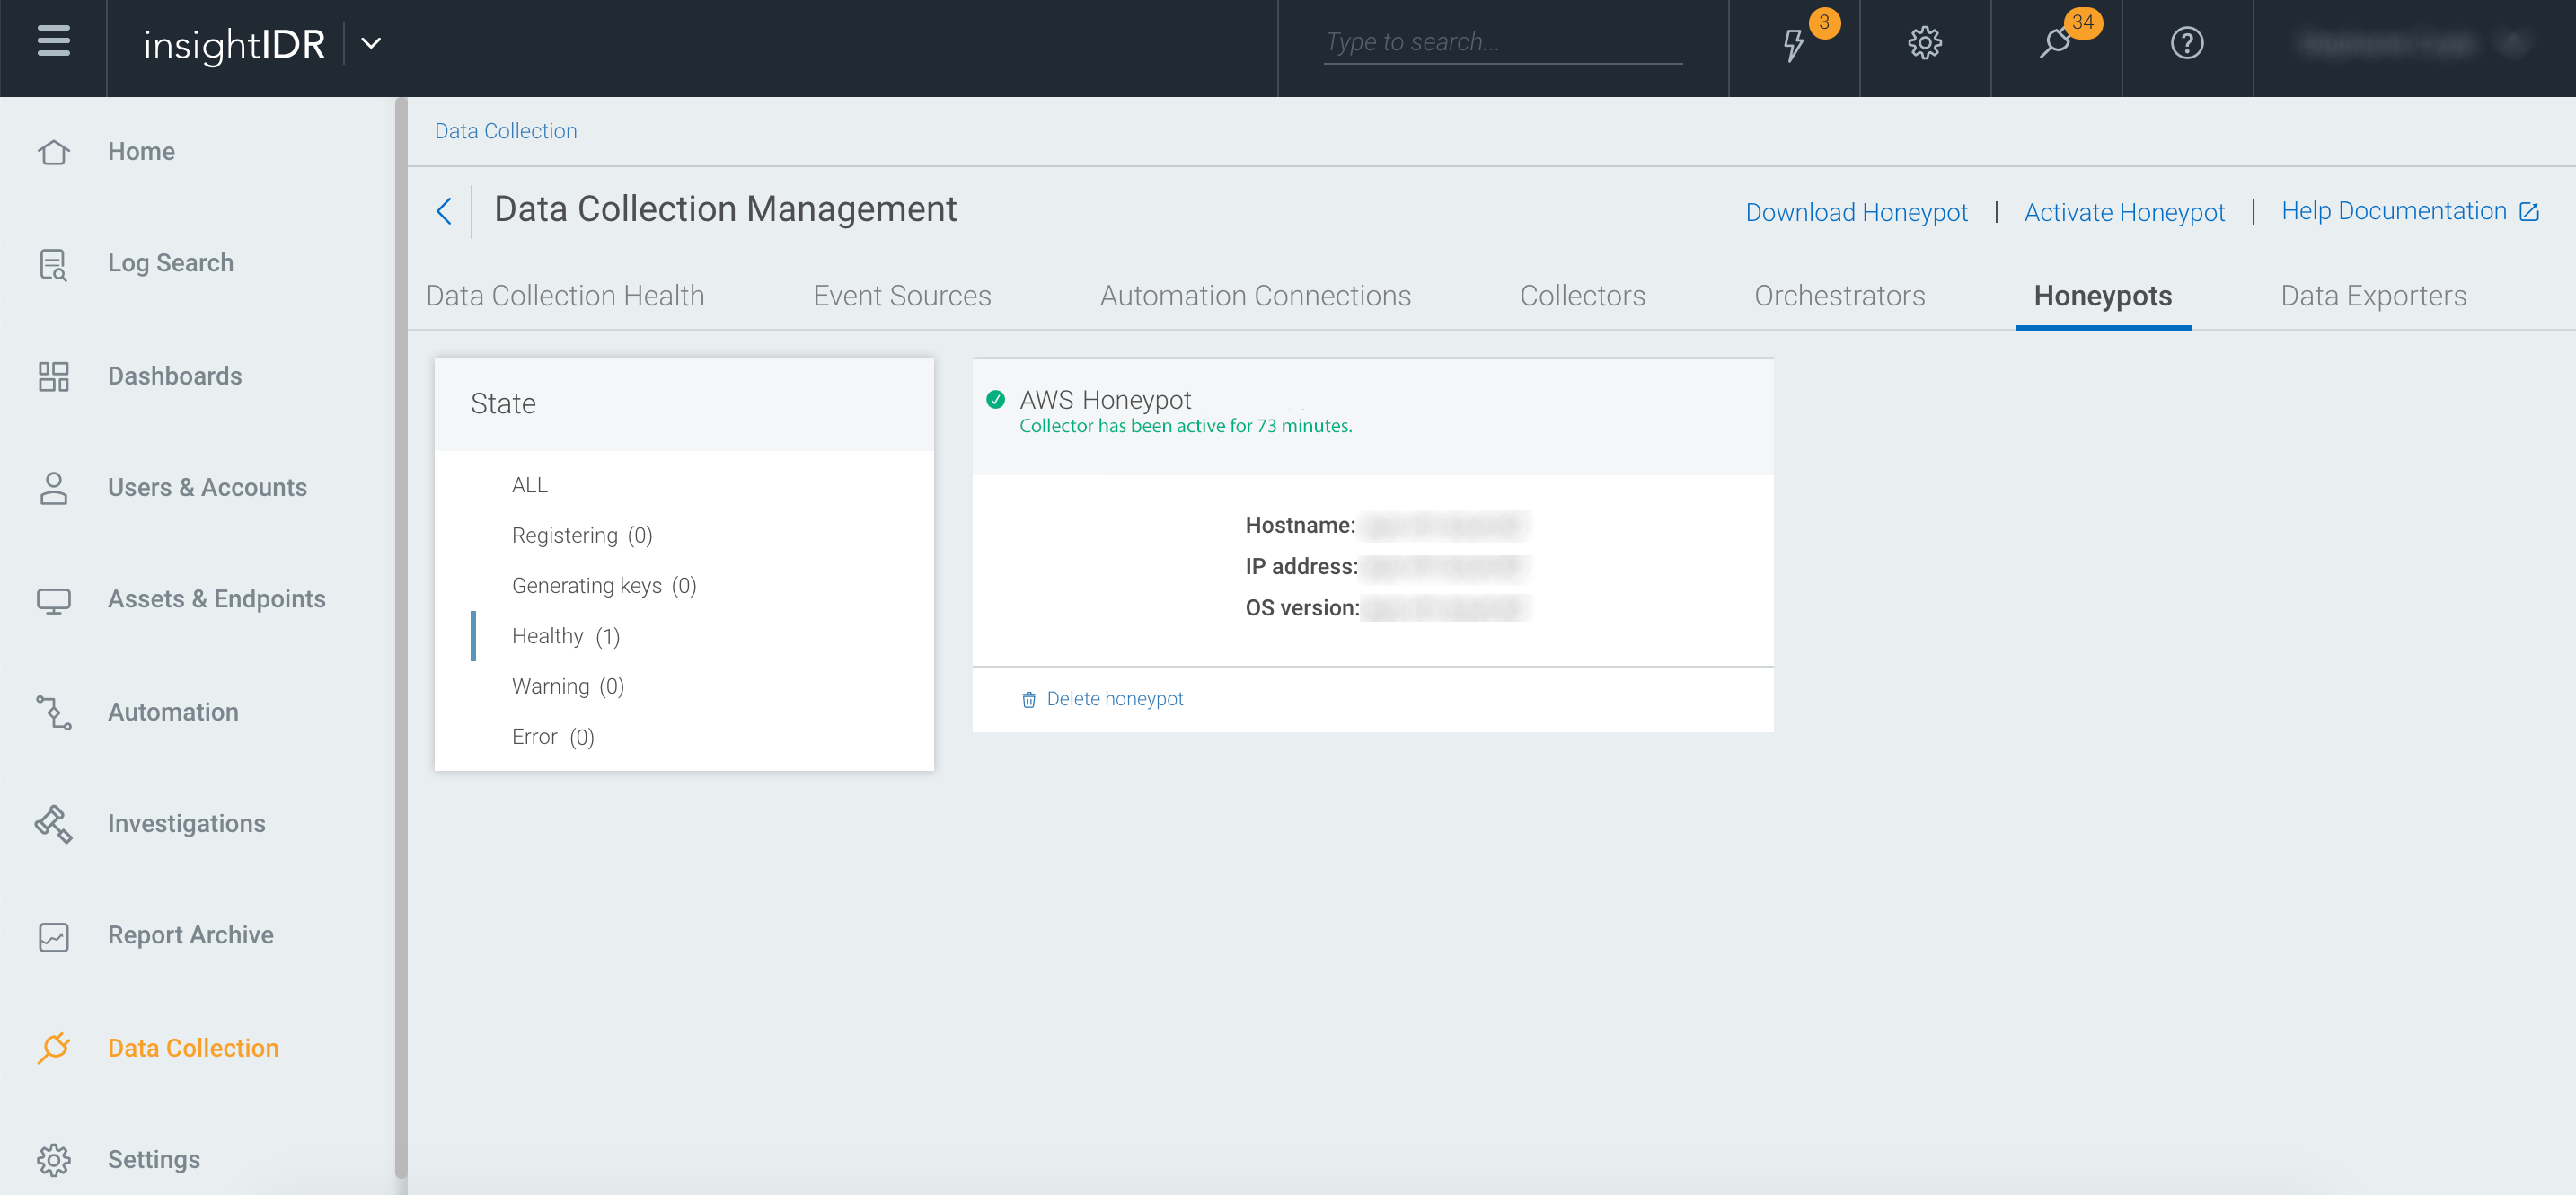
After yous take successfully created an AWS Honeypot using the token from InsightIDR, check to come across that the pairing was successful in the InsightIDR interface on the Honeypots tab of the "Information Collection" page.
Then, you can examination the pairing by triggering an alert.
Before you exam, ensure that you lot tin complete the exam from a organisation that can reach the Honeypot on the AWS network.
Then, choose one of the following ways to examination your AWS Honeypot:
- whorl to endeavor an http connexion to the honeypot IP address
- bones nmap scan
- standard discovery scan
- vulnerability scan
- SSH via PuTTY
- Bruteforce
Within minutes, y'all should come across a new warning from InsightIDR.


Source: https://docs.rapid7.com/insightidr/aws-honeypots/
Posted by: nichollsdaunt1983.blogspot.com
0 Response to "What Are Amazon Web Services (Aws) Honeypot Data"
Post a Comment